
Let’s talk about version control and collaboration today and one of its powerful tools: git ✨
💡What is Git?
Using Git can be a lifesaver (and it has often been one in the past for me 🙏). It’s basically like a mini time travel machine that you use - it allows you to have version control of your work progress. But unlike Dropbox or other tools, it does not automatically save the status quo of your work but requires you to do it actively with commits and pushes. A typical workflow looks like this:
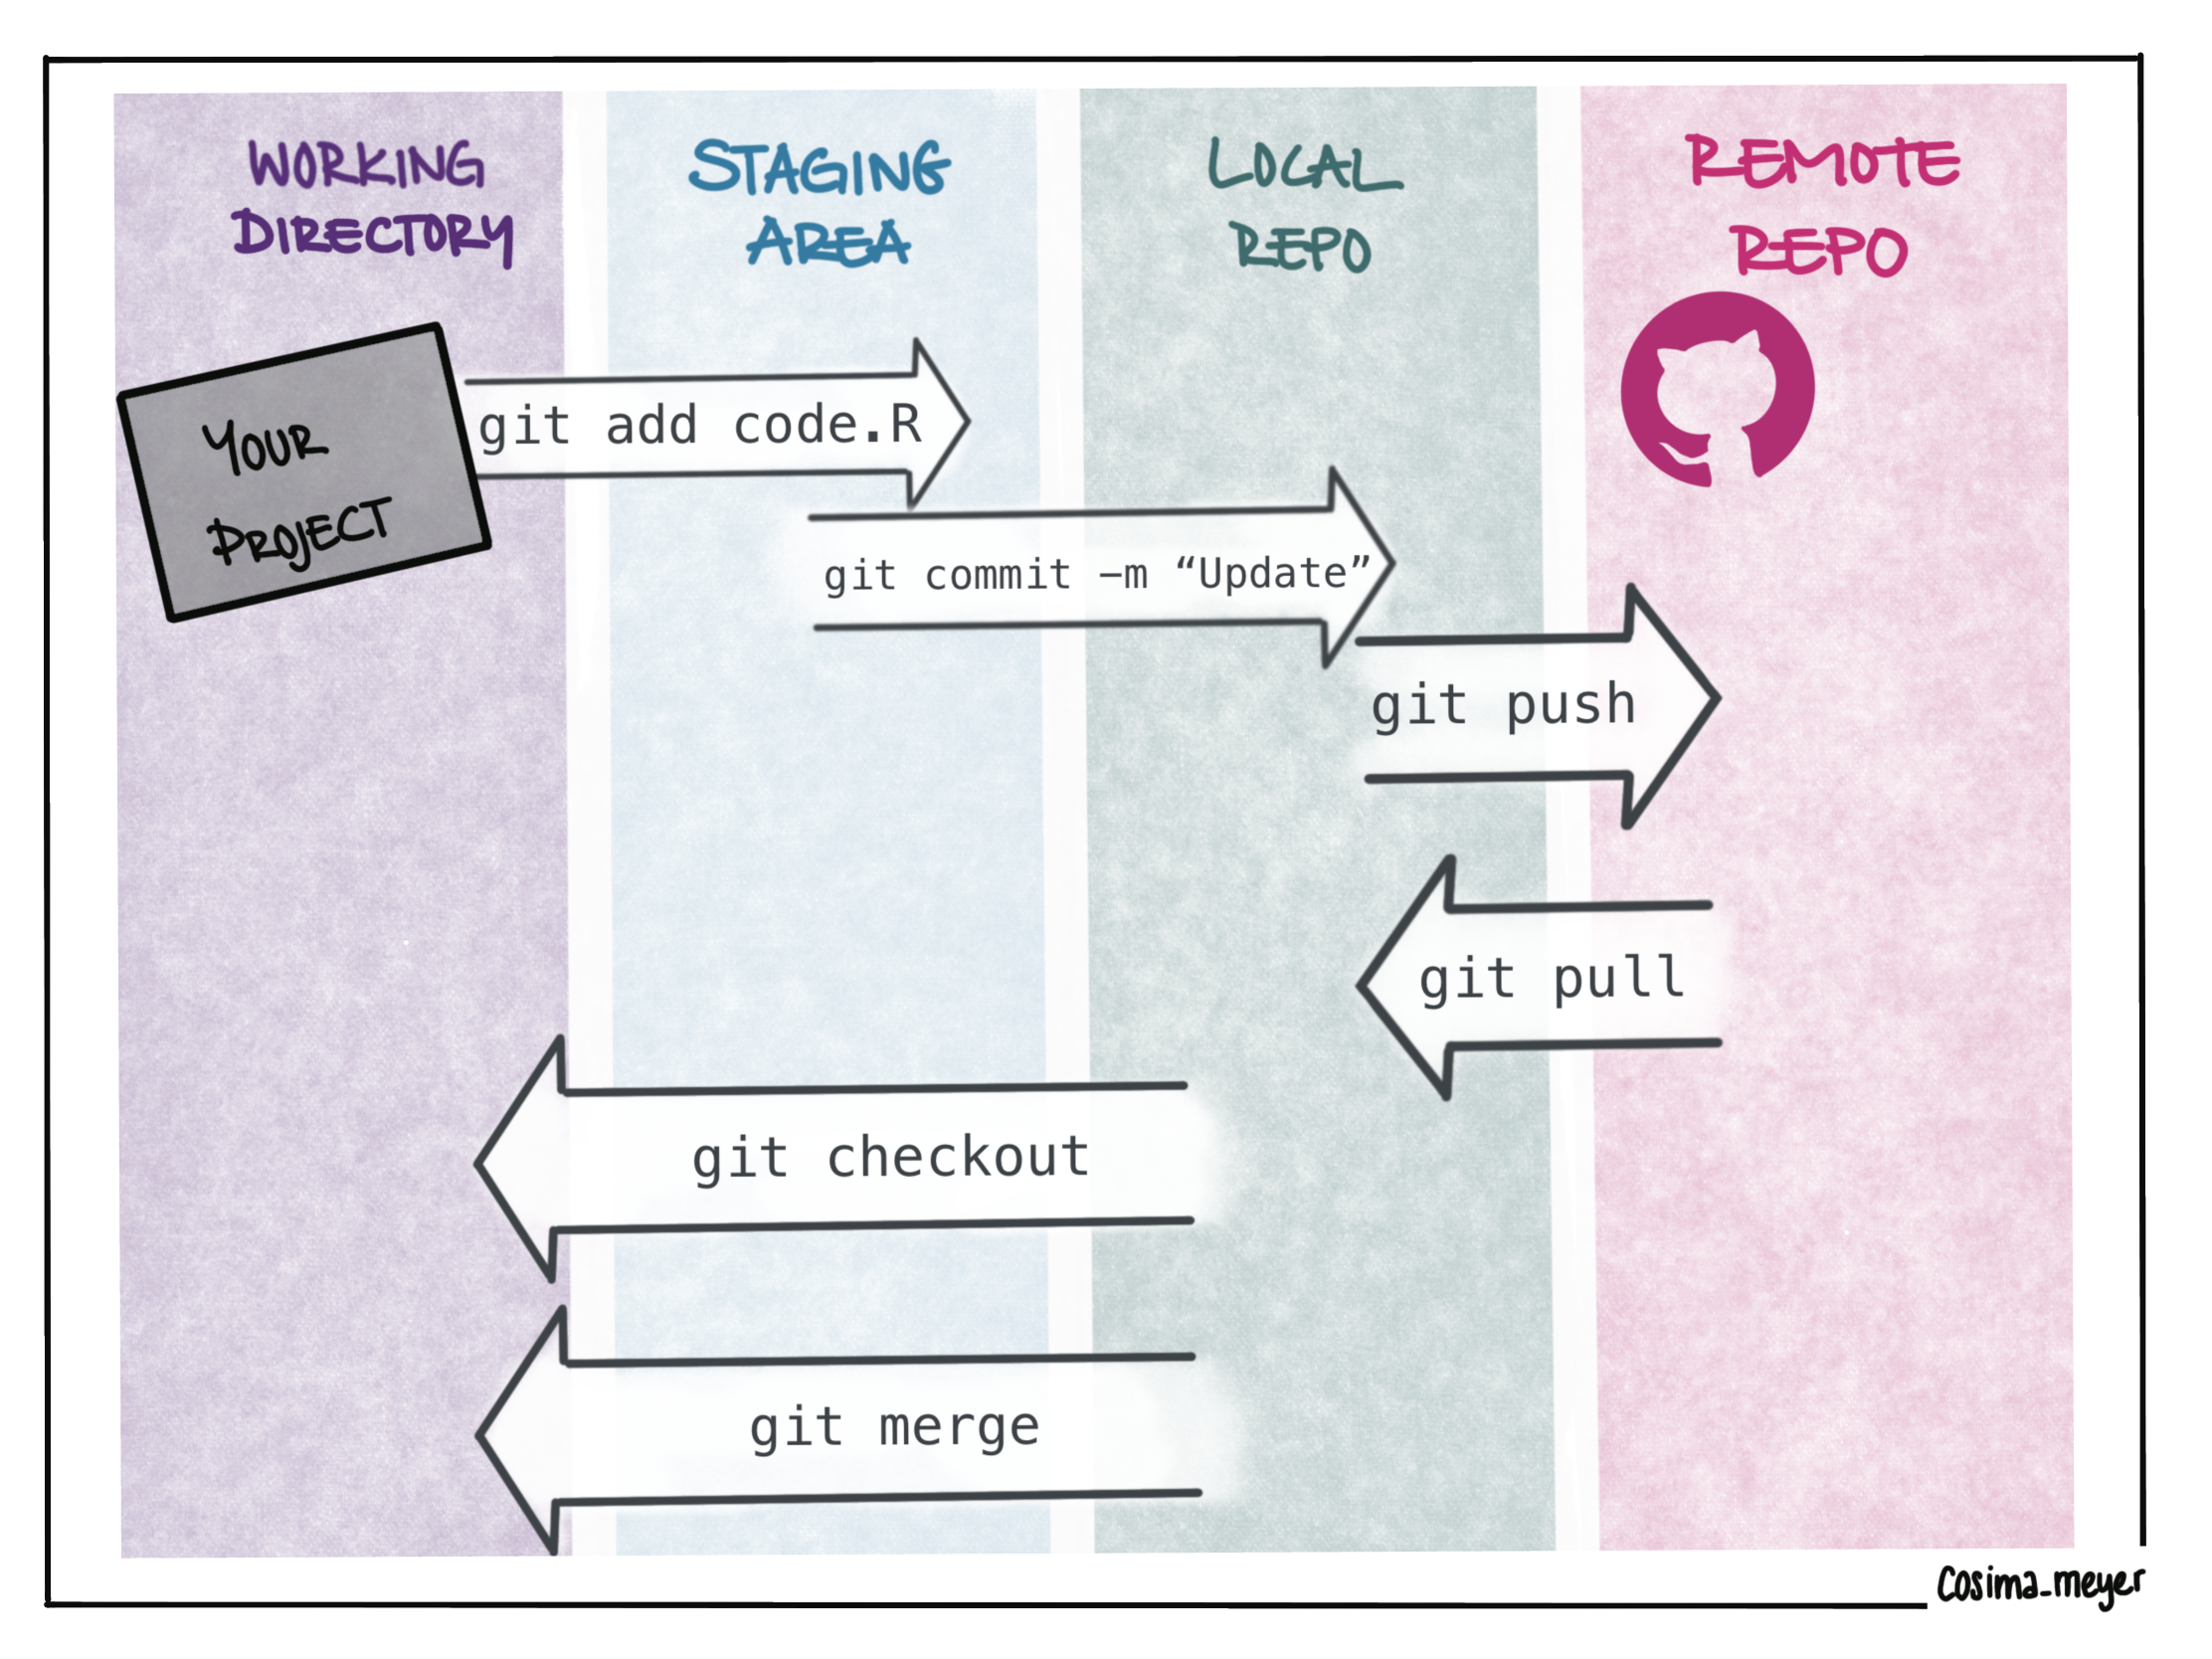
Alternative text
Image showing a git workflow from the working directory to the remote repo. Working directory → Staging area → local repo → remote repo and also common git commands (git add code.R, git commit -m “Update”, git push, git pull, git checkout, git merge)
RStudio has a nice GUI that allows you to do everything without writing code - but if you need to remember some commands, it’s most likely git add, git commit, git push, git pull, and git status (to check if you have uncommitted files) 😊
Here’s what the typical workflow can look like in action:

Alternative text
GIF showing the commands git add, git commit, git push, git pull in a sequential order
You start with your local repository on your own machine, work on your code and do some changes. Now the #git workflow starts 💫
git add: Once you made some changes, this command lets you add them to the staging area (this is an essential step before committing them and tells git that these are the files you want to commit in your next commit) 😊git commit: Once you made some changes, this allows you to “commit” them and to “version control” them in git. I talked to many people and I couldn’t find a best practice on how often you should send commits. I like to think of them as a status report or a (small) milestone to which you may want to return to. So I try to send a commit once a (thematic) step is reached.git push: If you hit this command, you will push one (or more) commits to the remote repositorygit pull: This is usually one of the first commands I execute - it pulls changes from others and makes sure that you’re working on the most current version 😊git status: This command allows you to check if you have still some uncommitted changes in files 🕵🏼
But there are many more commands out there! When I get lost, I usually find myself here looking things up at Atlassian 👩🏼💻
Growing trees 🌳
You have probably also heard of branches and merges in Git — this is an excellent way to collaborate with others. The GIF shows how you start working from the main branch (this is where all the changes should eventually end up and where your final product lives). Each dot shows a new commit that is pushed:

Alternative text
GIF showing how a feature branch evolves from a main branch and is then guided back (merged) into the main branch
Once you want to make changes (like integrating a new function in your package) you start a new feature branch. The feature branch eventually goes back to the main branch (this is what we call “merging”). The cool thing is that you can somewhat work independently from your colleagues or collaborators on individual tasks because they can start their own feature branch. Merging back feature branches (in the best case) requires a code review - you can also do this on GitHub and I’m a big fan of it because it makes you a better programmer step-by-step and allows sharing knowledge.
I learned it the hard way but it’s best if feature branches don’t get too long and complicated because it easily becomes hard to review them 🤓
If you want to visualize it yourself, here’s a slide deck 👩🏼🏫 that explains the workflows and more.
👩🏼💻How do you use GitHub and your IDE?
If you connect your local repository with a global repository (for instance on GitHub), you’ll be able to store it also in the cloud and access it from everywhere. Setting up this connection is extremely easy - also using different IDEs. The steps are similar but I’ll go into more detail for VS Code and RStudio (or Posit, as it will be called as of October 2022).
RStudio and GitHub

Alternative text
Visualization showing a typical workflow when using GitHub in RStudio with a new project: 1) Create a new repository on GitHub, 2) Open . Rproj in RStudio, 3) Connect with GitHub - and now it’s time to pull, commit and push :)
I worked a lot both in industry and academia using RStudio. It’s a fantastic and smooth IDE that allows you to write in multiple languages. The GIF below shows how I typically set up a project in RStudio with GitHub when working in academia.
GIF showing how I typically set up a project:
Alternative text
I create a GitHub repository first (depending on data privacy and other things, I go for either public or private but I always add a README. READMEs are great because they allow you to write a short description of your repository in markdown).
Then I go back to my RStudio desktop version and select “File” > “New project”. To enable version control, select here “Version control” and then copy-paste the link from your GitHub repository

Alternative text
Screenshot showing a green “Code” button on GitHub that reveals a HTTPS-based URL that you can copy
A new project opens and your version control is up and running 🎉
I realized that I usually start with a similar setup when working on an academic project, so I wrote a few code snippets that populate my .Rproj with files and folders. It’s described in more detail in this blog post that I wrote in 2020
# Set up the folder structure
folder_names <- (
    # Main folders
  c("data", "code", "figures",
    # Sub-folders
    "data/raw", "data/processed"))

for (j in seq_along(folder_names)) {
  dir.create(folder_names[j])
}


# Add files to the folders
file_names <- (
  c(
   # For preparing your data
    "1_data_preparation",
   # The merging file might also be combined
   # with the first file
    "2_merging",
   # For your descriptives
    "3_descriptives",
   # For your analysis
    "4_analysis",
   # For your visualization
    "5_visualization"
  )
)

for (j in seq_along(file_names)) {
  file.create(paste0("code/", file_names[j], ".Rmd"))
}

# Create a helper function file
file.create("code/helper.R")
You can either always copy-paste this code or turn it into a code snippet that lets you run it automatically when typing “academic” (or whatever word you prefer) and hitting “Tab”.
This example shows how it works with a header, but it can also be transferred to other setups:
I love it! That's beautiful 😍 I also love code snippets 💜https://t.co/VWjzm5rdum pic.twitter.com/4nr2EBNR4D
— We are R-Ladies (@WeAreRLadies) September 14, 2022
If you go for the snippets, here’s how it works:
- In RStudio, go to “Tools” > “Edit code snippets”
- Copy-paste this code and add it at the bottom of the R code snippets:
snippet academic
	`r folder_names <- (c("data", "code", "figures", "data/raw", "data/processed"))
	for (j in seq_along(folder_names)) {
	dir.create(folder_names[j])
	}

	file_names <- (c("1_data_preparation", "2_merging", "3_descriptives","4_analysis", "5_visualization"))

	for (j in seq_along(file_names)) {file.create(paste0("code/", file_names[j], ".Rmd"))}

	file.create("code/helper.R")`
- Save it - you’re all set.
- Type “
academic” in the console and hit “Tab” - and let the magic happen 💫
The GIF below shows it works in a local R project environment. Just start typing “academic” in the console, once you hit “Tab”, the files get automatically populated.

Alternative text
GIF showing how using the code snippet “academic” automatically fills the folder structure in your R project
📺 If you are looking for a tutorial on code snippets, have a look at Sharon Machlis' tutorial.
VS Code and GitHub

Alternative text
Visualization showing a typical workflow when using GitHub in VS Code with a new project: 1) Create a new repository on GitHub, 2) Clone repository in your VS Code, 3) Connect with GitHub - and now it’s time to pull, commit and push :)
Similar to RStudio, VS Code also lets you easily connect to GitHub to set up a working version control. It follows similar steps as the process in RStudio described above.
- Create a new GitHub repository
- Copy the link of your GitHub repository.
- Clone it in VS Code.
- You’re all set - the version control is up and running 🥳
I again create a GitHub repository first and copy the link.
Alternative text
Screenshot showing a green “Code” button on GitHub that reveals an HTTPS-based URL that you can copy
Then I go back to VS Code and select “File” > “New Window”. To enable version control, select now “Clone repository”, paste the link from the GitHub repository and save the repository also on your local machine by cloning it. The GIF shows this workflow with visuals:
GIF showing how I typically set up a project in VS Code:
Alternative text
And again, a new project opens and your version control is up and running and you can start working on your projects 🎉
Another cool thing about VS Code is admittedly its extensions. There are for instance some that show you the color behind the hex code but there are many more helpful GitHub extensions. I typically use these two (but the options are endless):
- GitHub Pull Requests and Issues - to manage to pull requests and issues in VS Code
- Git Graph - to visualize your Git trees
Other ways to use Git(Hub)
While most of you use Git(Hub) for version control, there are also other use cases.
Today @WeAreRLadies it's about one of the most powerful tools in your workflow: #git (and also GitHub as a hosting platform) 🤓
— Cosima Meyer 🦣 @cosima_meyer@mas.to (@cosima_meyer) September 15, 2022
What do you use Git(Hub) mainly for?
If you have interesting repositories to share, other use cases, or use all of them, put them in the comments 👇
GitHub is a code hosting platform (like GitLab or Bitbucket) that allows you to share your code with others but also to have it as version control for yourself. GitHub becomes more and more social — it now allows you for instance to generate a personalized README where you have a mini website. Here you can post things about yourself and your work👩💻

Alternative text
Screenshot showing an example of a GitHub README (a personalized landing page of a GitHub account)
The README is a great landing page to collect information about yourself and your work 👩💻 (it also works for organizations now!)
And it’s extremely easy to set it up: Create a new public (!) repository with your GitHub handle and a README file. Now you can start editing it and making it beautiful 💅

Alternative text
Screenshot showing an example of a raw GitHub README (a personalized landing page of a GitHub account)
📑 Here’s a short step-by-step guide on how to set up and change your README
🖥 And here are a million ways how to further customize your README - it’s fantastic and you can easily spend hours looking for the best design 🥰
I personally also use GitHub to star repositories that I find helpful ⭐ and to work together on projects (issues are fantastic tools and once you got the hang of pull requests and issues, it’s so satisfying to close them and check them off your list). It also helps you to organize things using agile working tools like Kanban boards (we have one for our package development).
If you’re up for some automated pipelines️, there’s “GitHub Actions” that (for instance) allows you to run your checks on your package once you push changes to GitHub (there’s more to this in the blog post on package development) but you can also use them to host a website (with GitHub pages), implement FTP deployments, and much more!
🏙 As the last gem, you can see a skyline of your activity on GitHub! Here’s mine from 2021:

Alternative text
Screenshot of a GitHub skyline showing the number of commits per day/week as skyscrapers
If you want to see what yours looks like, you can use this link 🎊
While I touched the surface of what Git can do, it’s an extremely powerful tool that has so much more to offer 🤩 Here are some more resources, if you want to learn more about it:
- 📖 Atlassian’s Git Tutorials
- 📖 Happy Git with R
- 📺 “Using Git and Github in RStudio” (Lisa Lendway) @ R-Ladies Baltimore
- 📺 “How to time travel with your code: Foundations of Git connectivity with RStudio” (Gracielle Higino) @R-Ladies Gaborone
- 📺 “Git and GitHub” (Betty Kalogeropoulou and Luminița Lăzărescu) @ PyLadies Berlin
- 📺 “Why to use Git and Git essentials” (Frie Preu) @ Methods Bites
📝 Here’s the summary of today’s input (also as 📄PDF for you to download here):
Visual summary of how to GitHub with RStudio and VS Code Left side: Image showing a git workflow from the working directory to the remote repo.
Working directory → Staging area → local repo → remote repo and also common git commands (git add code.R, git commit -m “Update”, git push, git pull, git checkout, git merge) Right side:
Visualization showing a typical workflow when using GitHub in RStudio and VS Code with a new project: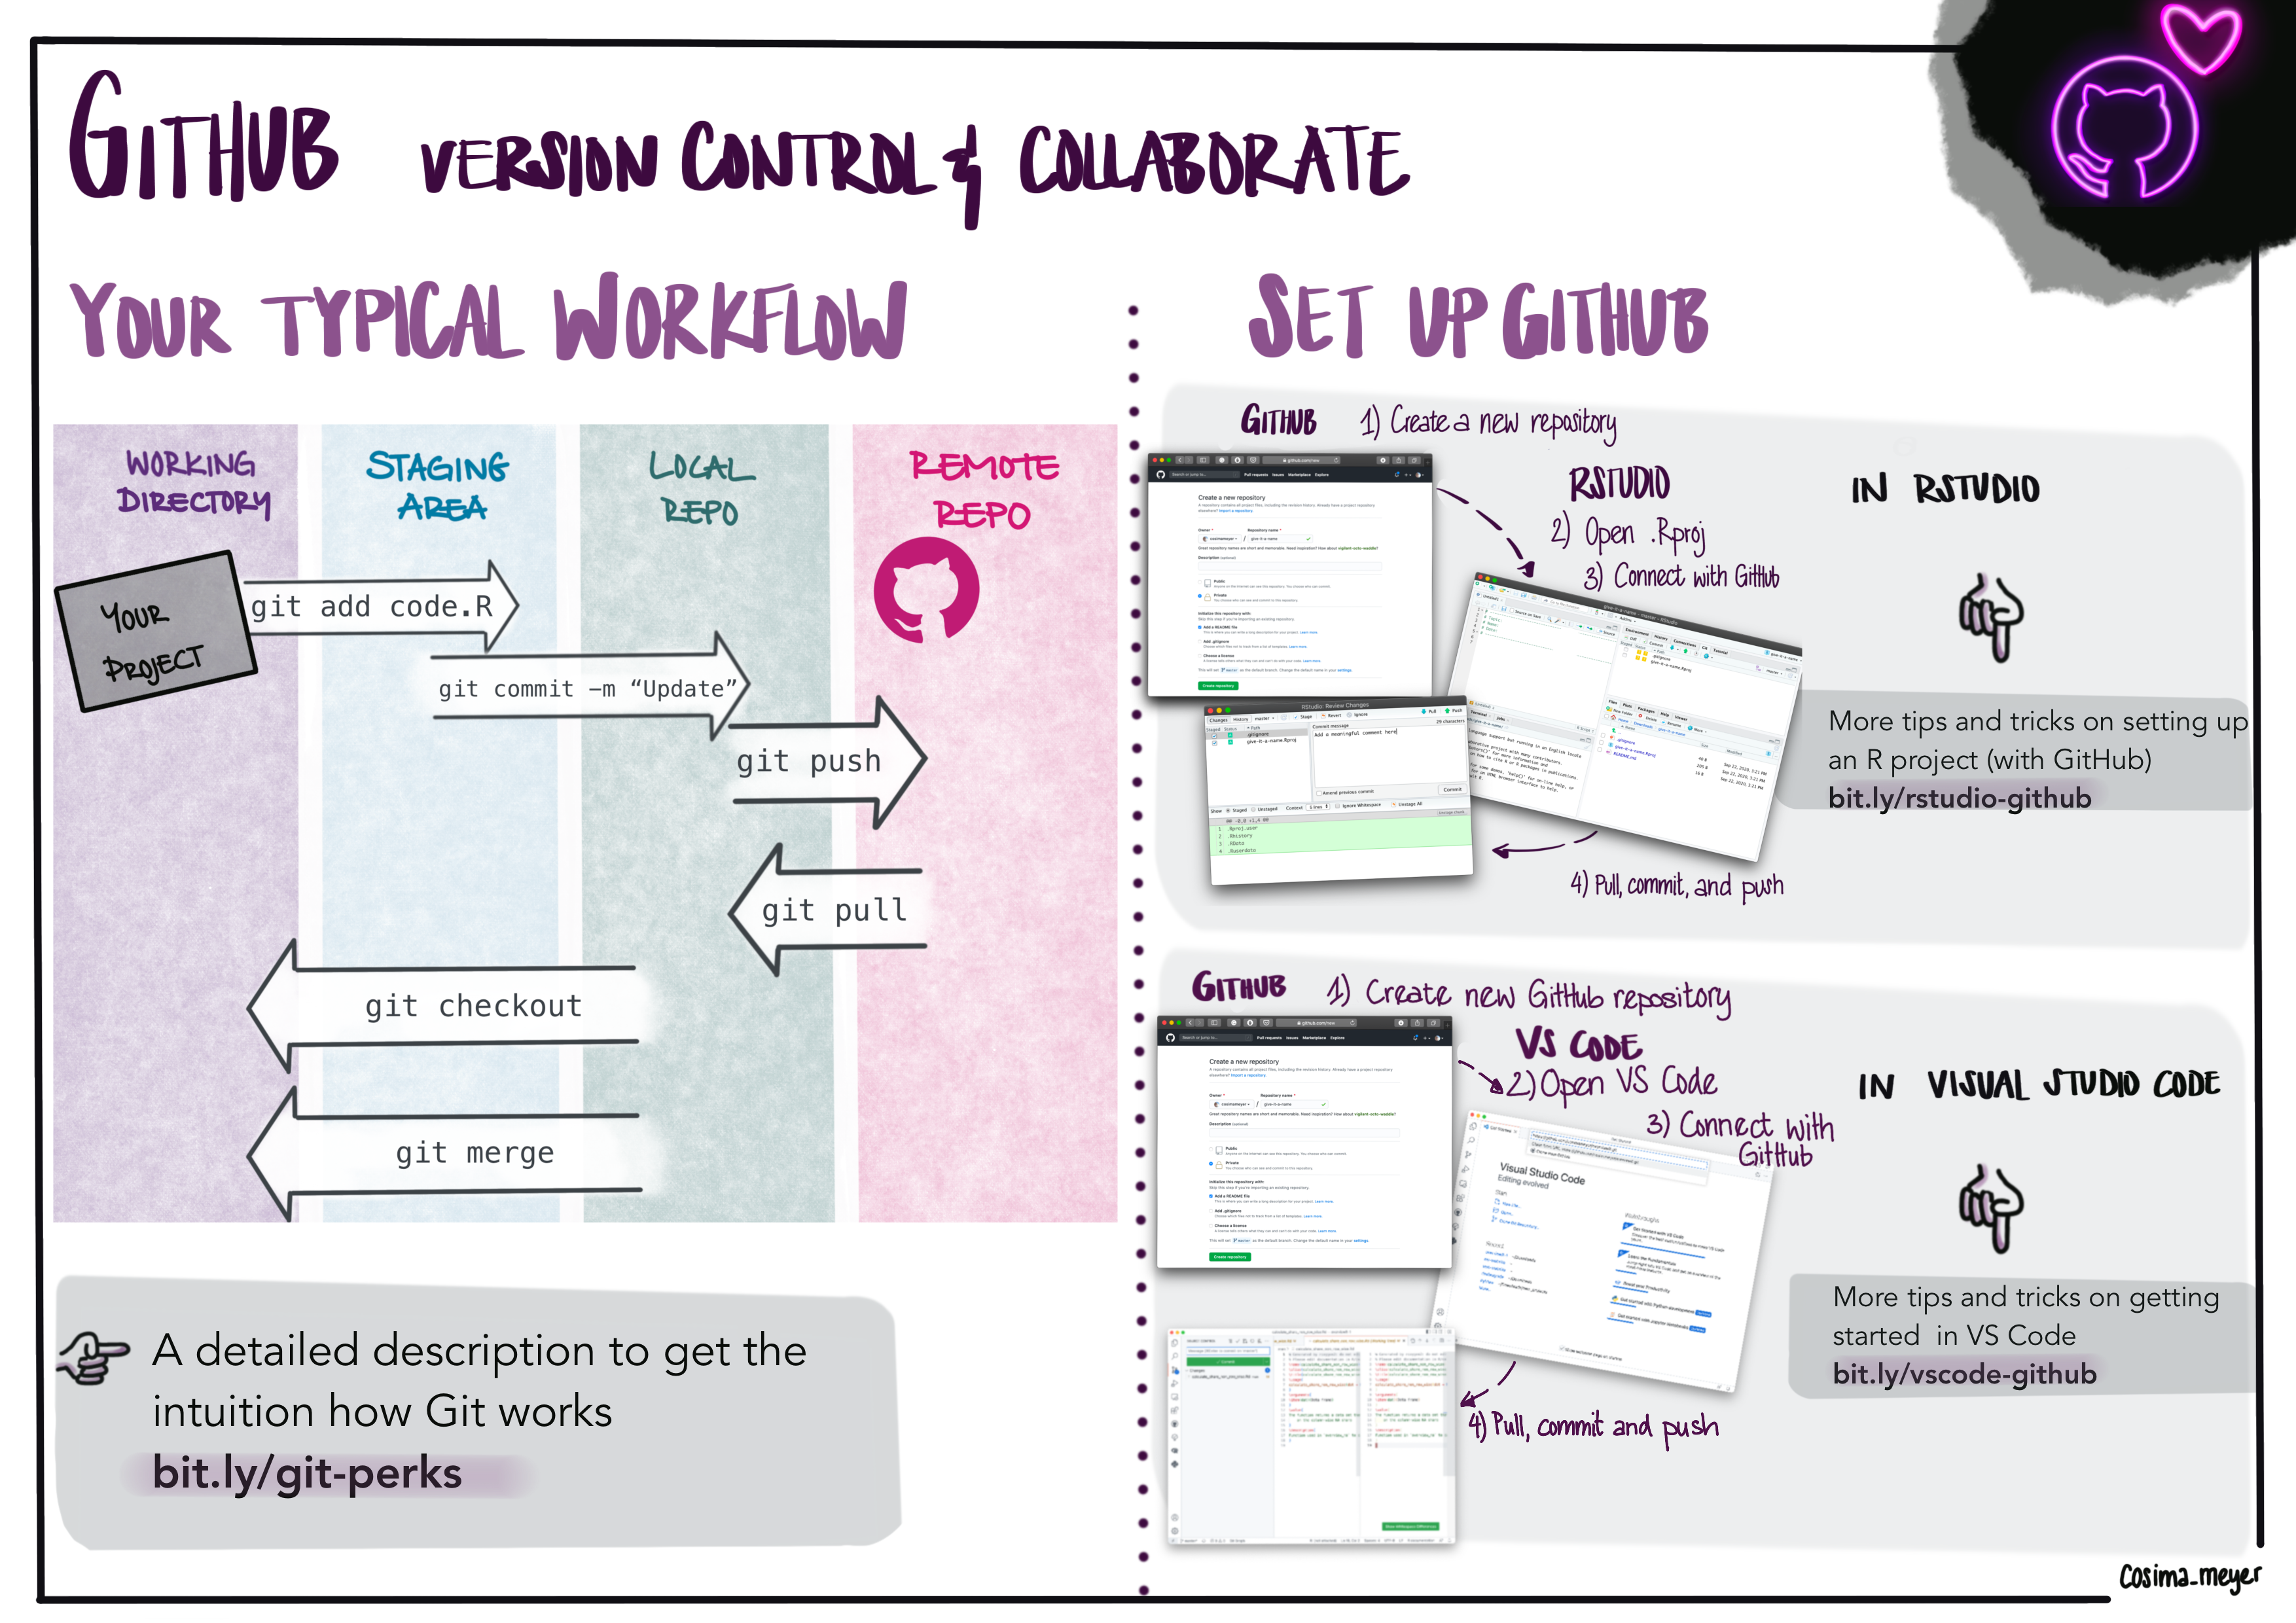
Alternative text
This blog post was last updated September 2022, 25.